Coffee Bar Ideas: How to Build a Functional Home Setup
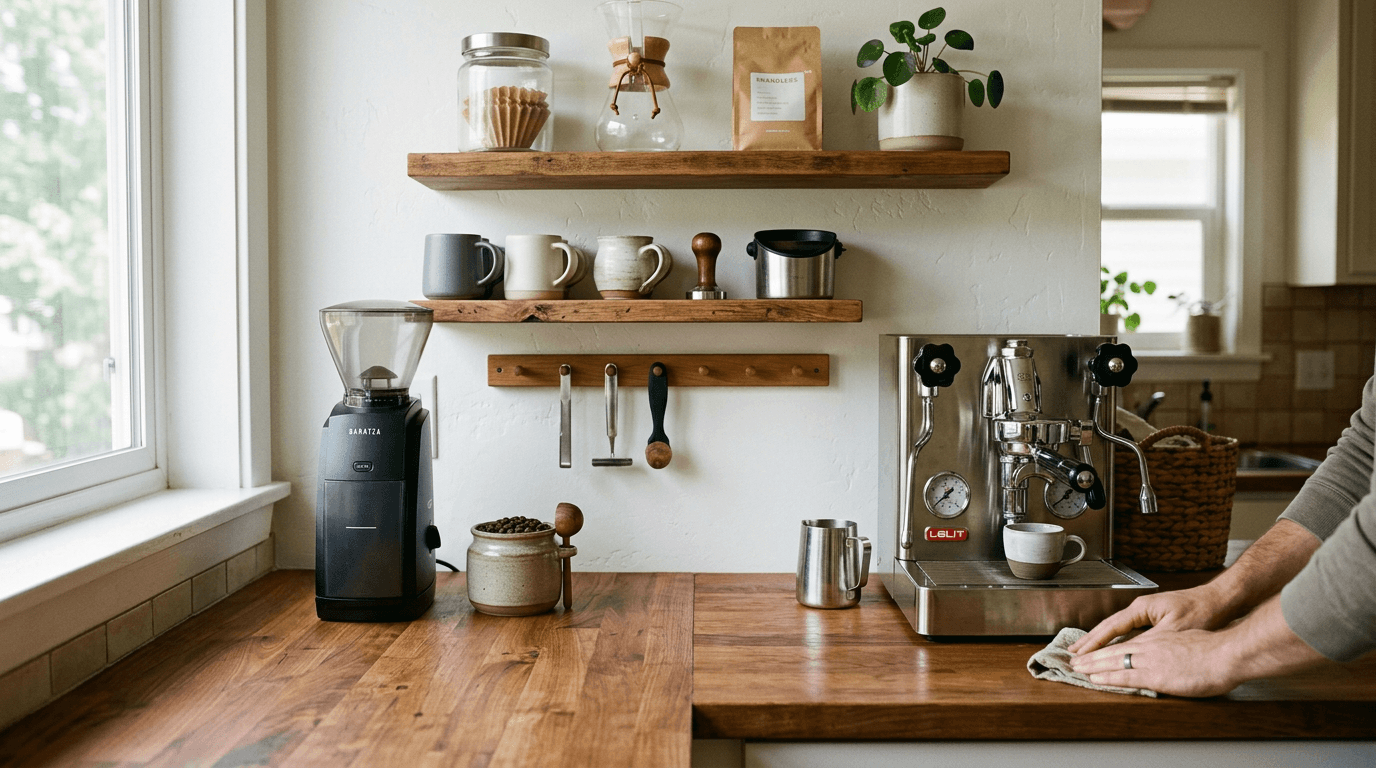
A common misconception when planning a home brewing space is that you must plumb a commercial machine directly into your kitchen mains to get cafe-quality results. In reality, the most reliable setups are entirely self-contained, built around workflow rather than infrastructure. Whether you pull shots on a dual-boiler or rely on a simple pour-over kettle, turning a crowded kitchen corner into a dedicated space requires deliberate zoning. Executing functional coffee bar ideas is about isolating your dry prep from your wet brewing, managing the high electrical draw of heating elements, and keeping your coffee tools exactly where your hands expect them to be.
Quick Summary
A home coffee station is a dedicated, self-contained zone designed specifically for the preparation, brewing, and maintenance of coffee equipment. It separates high-draw electrical devices from water sources and organizes gear to streamline the morning routine without cluttering the primary kitchen counter.
- Assess the layout based on horizontal clearance and structural weight limits.
- Isolate the wet brewing area from the dry grinding and tamping zone.
- Mount shelving or utilize cabinet space to store beans and ceramics vertically.
- Manage high-wattage power cables to prevent tripped breakers and tangled cords.
Table of Contents
- 1. Execute coffee bar ideas with the correct base structure
- 2. Separate the wet and dry zones
- 3. Build vertical storage for daily access
- 4. Route power safely for high-draw equipment
- Common Pitfalls & Troubleshooting
- FAQ
- Recommended Reads
1. Execute coffee bar ideas with the correct base structure

Why horizontal space dictates your setup
The foundation of any brewing station dictates exactly what equipment you can safely operate. A common mistake is buying the equipment first, only to realize the surface cannot support a 60-pound espresso machine alongside an independent burr grinder. Begin by measuring the linear inches of available space. If your kitchen lacks available built-in counter space, a freestanding coffee bar cabinet is often the most stable alternative. When evaluating a freestanding cabinet, pay close attention to the construction materials. Particleboard or medium-density fiberboard will rapidly deteriorate if exposed to standing water from a leaking reservoir. Solid wood or a sealed stainless-steel prep table provides the necessary resistance to both weight and moisture.
Furthermore, consider the height of the surface. Standard kitchen counters sit at 36 inches, but if you manually press espresso with a direct-lever machine or tamp heavily throughout the day, a slightly lower surface allows you to use your body weight rather than straining your wrists. Conversely, if your setup relies on tall pour-over stands, standard counter height prevents you from having to stoop.
If space is severely limited or you prefer a modular approach, a heavy-duty coffee cart offers flexibility. Carts work exceptionally well for pour-over setups or smaller pod machines because they allow you to wheel the station toward a water source when filling reservoirs. However, carts generally lack the structural rigidity required for forcefully tamping espresso. The primary failure mode here is choosing a cart with locking casters that still wobble slightly - this micro-movement makes precision pouring dangerous and tamping inconsistent. Prioritize weight capacity and static stability over aesthetics, keeping a rotating selection of beans like the Best Sellers Sample Pack: 6Bean, Cowboy, Breakfast, Peru, Mexico, Bali accessible but out of direct sunlight.
2. Separate the wet and dry zones
Mixing moisture with grinders destroys workflow
Workflow at a coffee station dies when you constantly cross your own arms or mix spilled water with dry grounds. The physical mechanics of brewing demand two distinct areas. The dry zone houses your grinder, scale, tamping mat, distribution tools, and the beans themselves. This area must remain perfectly dry because moisture causes coffee dust to clump inside grinder chutes, accelerates burr oxidation, and ruins the internal sensors of digital scales.
The wet zone contains your brewer, water reservoir, kettle, knock box, and a dedicated microfiber towel. When laying out the surface, arrange these zones sequentially based on your dominant hand. If you are right-handed, place the grinder and dry prep on the left, moving rightward toward the machine where the brewing and pouring happen. This creates a linear, one-way workflow that prevents wet portafilters from dripping over your fresh grounds.
Lighting also plays a critical role in zoning. Overhead room lighting often casts shadows directly onto the espresso machine's drip tray. Installing a small, battery-operated LED light bar under the overarching cabinet specifically over the wet zone allows you to see the exact moment your extraction begins to blonde without blinding yourself during an early morning routine. The most frequent error in this step is grouping items by height rather than function, which guarantees you will eventually drop wet grounds onto your scale.
Practical rule: Place your knock box and trash receptacle directly under the wet zone, ensuring you never have to carry a dripping portafilter or wet paper filter across the dry grinding area.
If your setup involves storing various origins, ensure your dry zone has immediate access to your beans. For instance, if you regularly pull shots of African Espresso, keep the canister strictly on the dry side to avoid steam damage from the boiler.
3. Build vertical storage for daily access
Leaving tools on the deck costs you workspace
Countertop real estate is the most valuable currency in any home brewing setup. Every item left on the deck reduces your working area. To maintain a functional station, utilize the vertical space directly above and below the primary surface. A dedicated coffee cabinet installed above the station is ideal for hiding items that do not look visually appealing or are susceptible to light degradation, such as paper filters, cleaning tablets, and backflush disks.
When mounting open shelves above the station, adhere to strict depth limits. A shelf deeper than 10 inches will force you to lean uncomfortably far forward to look into the top of your espresso machine's water reservoir, creating an ergonomic headache. Mount the lowest shelf at least 18 to 20 inches above the primary surface; any lower, and you risk trapping the steam vented from boilers, which will warp wooden shelving and leave a sticky residue of coffee oils over time.
Your essential daily coffee tools - such as distribution needles, tampers, and small dosing cups - should live on the counter, but cups and mugs belong on a shelf. A common pitfall is stacking heavy ceramics directly on top of the espresso machine to warm them. Home machines often lack the surface heat to warm thick ceramics thoroughly, and the internal pump vibration causes the cups to rattle loudly against the metal housing.
Place your everyday drinkware securely on a shelf. Whether grabbing a standard piece or a rugged Enamel Mug for a morning on the patio, keeping them off the brewer prevents accidental chipping. Similarly, if you enjoy switching routines by brewing loose-leaf Earl Grey, store the steepers and tea tins on a secondary shelf rather than letting them crowd your primary equipment.
4. Route power safely for high-draw equipment
Shared circuits will trip during peak electrical loads
Brewing equipment consumes a massive amount of electricity. An espresso machine's boiler and a high-end burr grinder can easily draw upwards of 1,500 watts simultaneously. Plugging both into a basic extension cord or a shared power strip is a fire hazard and the fastest way to trip a residential circuit breaker. You must verify that the wall outlet serving your station is on a dedicated 15-amp or 20-amp circuit, separate from major kitchen appliances. If your station is located near a sink or a secondary water line, local building codes generally mandate a Ground Fault Circuit Interrupter outlet to protect against fatal shorts in the event of a spill.
Never plug a high-draw boiler into a cheap consumer surge protector designed for computer peripherals. These strips use thin internal wiring that heats up under sustained 15-amp loads, posing a severe fire risk. Plug heavy heating elements directly into the wall receptacle.
Cable management is not just an aesthetic concern; it is a strict safety requirement. Secure all heavy-gauge cables flat against the back of the furniture. Use adhesive clips to route the grinder and machine cords down the rear legs of the cart or the back panel of the cabinet, keeping them elevated off the floor where spills inevitably pool.
The mistake people actually make here is leaving extra cord coiled directly on the counter behind the machine. Because brewers emit steam and heat from the rear vents, these coiled cords degrade over time, leading to brittle insulation. Always pull the slack below the counter level. If your routine includes preparing Cold Brew Coffee using an automated countertop system alongside your hot brewers, ensure the layout accommodates multiple plugs without relying on daisy-chained splitters.
Common Pitfalls & Troubleshooting
Setting up a brewing area often looks perfect in a photograph but fails during the morning rush. The following failures look like equipment problems but are almost always layout and organization issues.
The Grinder Chokes Frequently
- Symptom: Your electric burr grinder suddenly stops passing grounds, the motor whines, and coffee backs up into the chute.
- Fix: Move the grinder away from the espresso machine's steam wand or kettle's exhaust. This environmental layout error is the most frequent cause of grinder choking, rather than a mechanical failure. The steam causes coffee dust to cement itself inside the burr chamber. Relocate the grinder to the far opposite side of the station and thoroughly brush out the chute.
Inconsistent Extraction and Channeling
- Symptom: Water sprays in random directions from your bottomless portafilter, or your pour-over bed is always dramatically uneven.
- Fix: Level the underlying furniture. A cart or cabinet that leans even slightly will cause water to pool on one side of the coffee bed, leading to severe channeling. Place a standard bubble level directly on the drip tray or the counter surface. If it leans, adjust the leveling feet on your furniture before assuming your tamping technique is flawed.
The Station Always Smells Sour
- Symptom: A lingering, stale odor surrounds the area, even after you wipe down the countertop and empty the drip tray.
- Fix: Empty and wash the knock box daily, and check for micro-spills behind the machine. Often, wet pucks are left to mold inside an enclosed drawer, or water has seeped between the back of the cabinet and the wall. Keep the knock box in a ventilated spot and pull the entire setup away from the wall once a month to sanitize the hidden perimeter.
The Water Reservoir Forms a Biofilm
- Symptom: The inside of the water tank feels slimy to the touch, and the resulting beverages taste muddy or overly metallic.
- Fix: Relocate the station away from direct sunlight. When an acrylic or plastic water reservoir sits in the path of a sunny window, the combination of standing water and UV light rapidly encourages bacterial growth. If you cannot move the furniture, wrap the reservoir in a dark vinyl decal or upgrade to an opaque tank.
FAQ
Does a home coffee bar require direct plumbing? No. While direct plumbing eliminates the need to manually refill water reservoirs, the vast majority of premium home brewers use internal tanks. A self-contained setup with a dedicated water filtration pitcher is fully capable of producing exceptional results without cutting into drywall.
How much counter depth do I need for a standard setup? Most equipment requires a minimum depth of 20 to 24 inches. Anything shallower forces the grinder and the brewer to sit too close together, compromising your ability to keep the wet and dry zones completely separate.
Can I use a standard kitchen island as a brewing station? Yes, provided you establish clear physical boundaries. A kitchen island often lacks a backsplash, meaning spilled grounds or hot water can easily fall off the backside. If using an island, invest in a large, heavy-duty silicone tamping mat with a raised lip to contain messes.
Why shouldn't I store my beans in the fridge next to my station? Moving beans in and out of a cold environment introduces condensation every time the bag is opened. This moisture rapidly degrades the oils inside the roast. Instead, store your daily supply in an opaque, airtight canister directly on the counter, well away from the heat of the machine.
How often should I tear down and deep clean the station? Perform a surface wipe down daily, but plan for a full tear-down once a month. This involves unplugging and moving heavy equipment off the surface entirely to clean the coffee oils and dried splashes that inevitably find their way behind the machinery.